• About
  • Links of Interest
  • Miss Trilly
    • Makeover Details
    • Miss Trilly’s Attributes
  • Mr Higgins

Towing Miss Trilly

~ with appearances by Mr Higgins

Towing Miss Trilly

Tag Archives: DIY

The Final Chapter (until Fall)

22 Monday Apr 2013

Posted by clark9ah in Miss Trilly

≈ 3 Comments

Tags

camping, DIY, IKEA hack, interior design, Travel, vintage trailer

The weeks of seemingly nonstop tasks are finally at an end. Miss Trilly is snug in her Summer Palace in Oregon. We left her with caring family on April 16th, continuing north without her trailing behind Zuzu. It was sad to be parting without having time to fully enjoy her fresh new look, but she is packed for camping and ready for our return in October. It is our plan to head northeast from Oregon on our first big journey together. We are excitedly looking forward to an extended trip to parts of the country we haven’t yet explored. Miss Trilly has a new lease on life as an able traveling companion, all dressed up with places to go. She (and we) will be waiting patiently until then.

The Unveiling

April 8th was the official unveiling of our sweet Trillium’s makeover to family and a couple of special friends. Nina’s mom was invited into Miss Trilly’s bosom as soon as all her new accoutrements were in place. Mom was extremely accommodating and gracious. She was highly aware of all our difficulties, challenges, and the extraordinary amount of time we had put into the project. For three months, we had taken over her garage, set up a worktable in the office, stacked foam and fabric in the sewing room, spread yards of fabrics across the family room floor, cleaned aluminum windows on the side yard picnic table, and even used the expanse of the backyard deck for spray gluing. Mom had earned the privileged position of first viewing. Choking back tears, she managed the words, “It is so beautiful!”
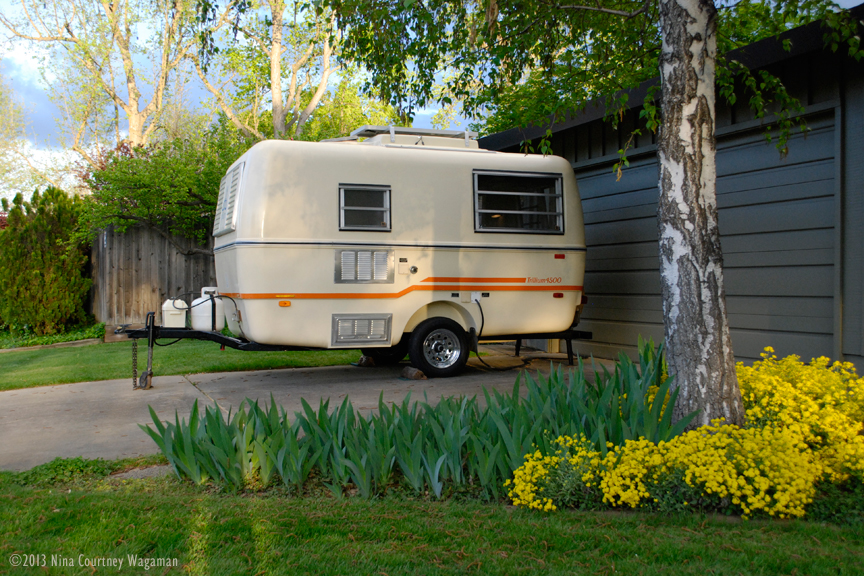
She is beautiful…

20130422-173830.jpg

Some details… The window shades are what I guess is known as an IKEA Hack (there is a website devoted to projects using IKEA products in unique ways). I used beige Anno Sanela curtain panels, which are made of paper and look like fine grasscloth. Only fifteen dollars apiece, three were more than enough to make shades for all the windows. I sliced up the 23.5″ x 118″ panels with a rotary cutter and glued them back together with the wonderful adhesive from Beacon, Fabri-Tac. The shades roll up by hand and fasten to a large wooden bead attached at the header with a single loop of cord, crocheted out of embroidery floss because it was the only thing I could find that was the right color. The headers are accented with welting made from the seat upholstery fabric. I waterproofed the small shade over the door window with spray silicone. Forty-five dollars, a bottle of glue, some scrap wood cut to size and painted, five beads from an old necklace, and three skeins of embroidery thread at thirty-seven cents… Voilá, lovely window coverings with a definite Zen feel. Peaceful. Simple.

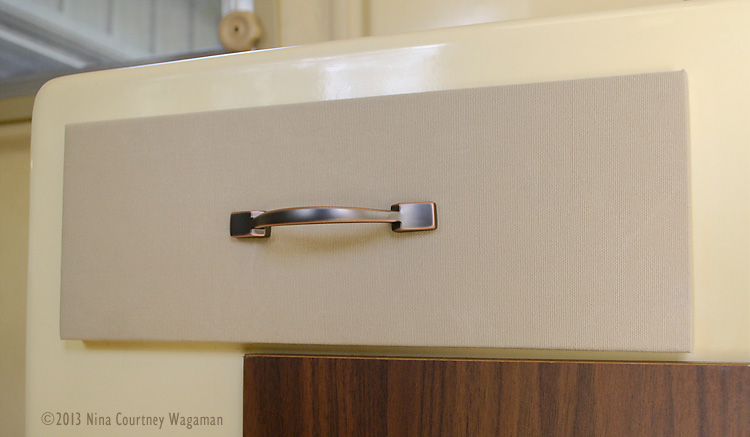
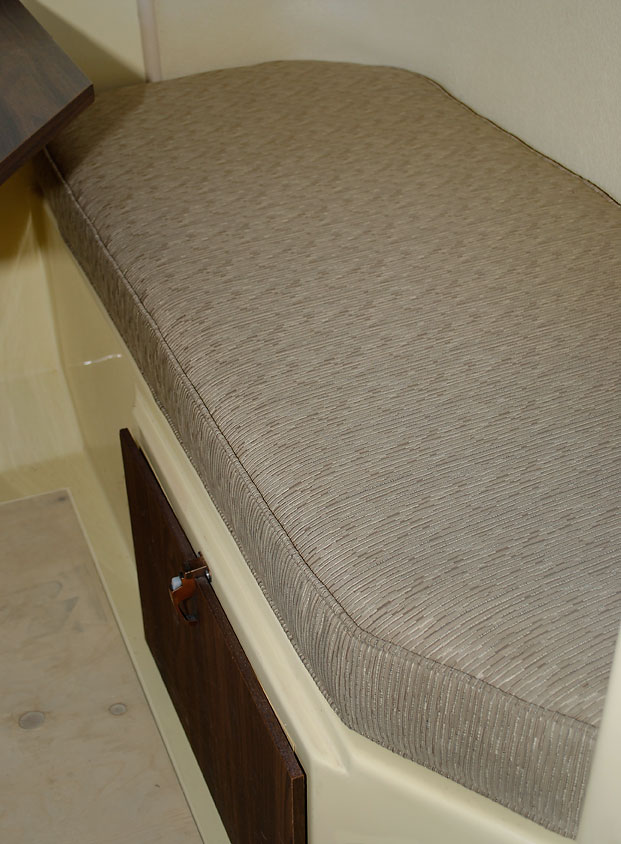
One of the trickier aspects of the new upholstery was a result of our decision to create wrap-around cushions for the front dinette. We assembled the foam shapes from “Q” foam we had left over from our boat cushions. It is very high quality material, expensive too, and we had saved all unused pieces. We glued slabs together to the size and thickness we desired, using spray adhesives. We used both 3M High Strength 90 and Loctite Professional. Each has a web spray pattern, which is easier to control. I found that I prefer the 3M product. We had used that on our boat headliners and it has held up well since 2004. We let the glue cure overnight, then cut wedges out where we wanted the cushion to make a curved right angle. The first set of wedges weren’t deep enough, so we cut them larger and glued again, jamming the folded foam under some furniture to force it into a tight bond. Here is Clark cutting the foam with an electric knife that we found at the thrift store for fifty cents.

20130424-140936.jpg

And here is a finished corner cushion. This is the starboard one with the back shaped to accommodate the bump next to the door. This allows for a cushion the full width of the seat.

StbdFwdCushion

On the Road!

On April 11th, together we hit the pavement, driving north on Highways 70/99 through Yuba City and Chico, joining I-5 at Red Bluff. This is “the scenic route”, more leisurely without the interstate’s many trucks and vehicles whose drivers always seem to be in a hurry. The day was clear and mild, a perfect day to enjoy the passing rows of flowering fruit and nut trees of Northern California’s “fruit basket” agricultural area. We were aiming for Valley of The Rogue State Park, just a bit shy of Grants Pass, Oregon. We wondered how well Zuzu would behave towing the Trillium through the winding passes and steep grades of the Klamath Mountains. This system includes the mighty volcanic Mount Shasta and the somewhat infamous Siskiyous. We were especially curious to see how she towed after we simplified the hitch setup by removing the trunnion weight distribution kit, which we felt was unnecessary for towing our Miss Trilly’s mere 1300 pounds.

The driving proceeded beautifully and we enjoyed the sights along the way–our view of Mount Shasta was glorious. The traffic was remarkably light and our Trooper didn’t flinch with the trailer obediently following. It was much less bumpy and jarring towing without the weight kit on the hitch. We were able to pass the double-rigs as they negotiated the downgrades under low gear and slowed to a crawl on the upgrades. The going was comfortably smooth.

Inside Oregon, we pulled off in Medford to fill the fuel tank at Costco, then drove on to the state park where we found a spot to spend the night beside the Rogue River. Unfortunately, the camping area is also flanked by the freeway on its other side. The trailer seemed to dampen the whoosh of traffic–we were glad not to be sleeping in a tent!

Dinnertime. No propane. Hmmmm, we had tested it before we left. It had to be that the 34-year-old regulator decided to take that moment to give up the ghost. Cold chicken thighs with slices of Irish cheddar and Jarlsberg took the place of a hot chicken and cheese omelet that night. We slept very well on the custom mattress that came with Miss Trilly. I made up the bed with our fleece sheets and a “down alternative” throw (Don’t you just love that? It’s just Dacron, folks.) from Costco. It felt just like our berth on the boat or the bed at our studio in Sacramento–much nicer than sleeping bags. Without propane for the wall heater, we were fortunate to have electricity for the small space heater because it got very chilly. We had to wear earplugs to block out its loud fan and the freeway noise. In the morning, we went into Grants Pass to find a restaurant for hot coffee and breakfast. We admit with some reluctance that we ended up at Denny’s, where we split a Grand Slam with four eggs and four slices of paper-thin bacon.

20130424-135936.jpg

I looked up RV parts stores and, after a foray into the town’s nicely stocked Fred Meyer store, we pulled into a yard with dozens of new motorhomes for sale. The gal behind the counter told us, after we explained our regulator problem, that they would charge $44 just to “take a look at it.” We were in the wrong place! On the road again, we hadn’t even reached full inertia when we spied a small RV yard on the west side of the freeway. We took the off ramp immediately coming up and pulled into Oregon RV Outlet, where Howard sold us a new regulator for only $17. They were doing work on a very unusual vintage fiberglass trailer, one of only two made in 1969. The name on the side of this beautifully painted unit was “Experimental Grimm-Aero.” We have not been able to discover any more information.

The Exit 99 (Canyonville) off-ramp took us to the only privately owned rest stop on the West Coast, Jordan Creek. It is on the Seven Feathers Casino property. It is very well appointed and it’s BIG. I learned the details about this new rest stop on the internet using 3G on our iPad as we drove away. This rest stop has only been open since autumn of 2012. A sign indicated that a maximum of twelve hours of parking is allowed. We marked it down as a potential overnight location.

Next stop, the Salem Costco for gas. While Clark waited in line, I ran in to use the restroom. On the way, I noticed that they had the 10′ x 20′ carport we had purchased in Sacramento on display. If you are a Costco member, you will have learned to buy what you want the first time you see it in the store, because when you go back the item may be sold out. That is what we did with the shelter for Miss Trilly. Yes, we could have saved paying California sales tax, but we did not want to take the chance of Salem not having any available. Besides, we had to pack all our boat gear around that gigantic box.

We arrived at my aunt’s rural home just after 4:30 p.m. My cousin and her husband were out working in the expansive yard. The weather was now cold and gray, quite a change from sunny, warm California. Rain was in the forecast, so the huge box that held the Summer Palace was immediately unloaded from the Trooper. We had the frame all set up and ready for footings before dinner. Easy.

The guys made a trip into town the next morning for concrete. They set about making forms and digging post holes as anchors. We understand that the area is subject to some strong, unpredictable winds. We certainly don’t want the vinyl-covered tent to be lifted off its legs and blown around, so it is secured every which way. My family is very generous in providing the space for and attention to our trailer, and we want to ensure that having this new object to care for is as simple and uneventful as possible. The shelter must also be attractive and unobtrusive. Terri’s prowess as a gardener is obvious–her landscape is simply lovely, manicured to perfection, with wonderful combinations of textures and colors. The new addition to the yardscape is more than acceptable, she told us, and it is not white! (Believe it or not, this is important.)

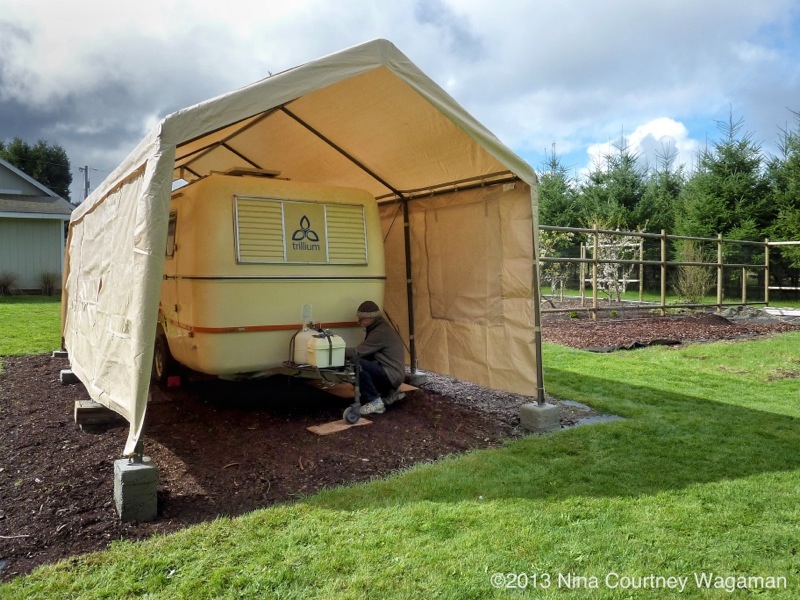
The men building forms as Miss Trilly awaits.

20130424-135731.jpg

The Summer Palace complete with our sweetheart snugly ensconced…

20130424-145914.jpg

Here we must leave Miss Trilly and you, our dear readers, for we are now back aboard our trimaran, Rikki-tikki-tavi, readying him for a full six months of cruising the Pacific Northwest. Clark and I will pick up where we left off when we return, put Rikki-tikki to bed for the winter, and begin our Great Journey with Miss Trilly. Until then, we wish all of you safe travels and wonderful adventures!

20130424-150733.jpg

Happy travels!
9ah and Clark

Nearing the Finish!

03 Wednesday Apr 2013

Posted by clark9ah in Miss Trilly

≈ Leave a comment

Tags

DIY, interior, interior refurbishing, vintage trailer

Our “finish line” of having Miss Trilly ready for the road is coming into view. All the Hehr jalousie windows have been removed, cleaned up, and reinstalled. Originally, plywood strips surrounded the windows. Clark cut solid wood as replacements. The windows were attached into these using new stainless screws. The sealant, butyl “combo” tape generously applied, will stop any leaks for perhaps three more decades. We are elated that this undertaking is complete. My fingernails are completely worn down from all the scraping and steelwooling. Even though I strongly dislike cleaning aluminum, I enjoy seeing it clean and shiny. However, one can never remove all the corrosion and pitting. Just accept it.

Removing the vinyl-faced Ensolite insulation from the wood strips inside the trailer was difficult and tedious. The cement used in 1979 stuck very well, especially on the wood that was not rotted. A very sharp thin bladed kitchen knife, I found, was the best tool. It was the point of the knife that presented a hazard – too easy to slip and make a mistake. I only poked through the face once when freeing a corner from the wood. Hopefully, I will be able to repair that small tear satisfactorily. I never want to have go through slicing Ensolite off of wood again, so we trimmed the windows with painted wood. This finishes off the contemporary look very well and holds the wall insulation in place, covering up any holes from previous window covering installations.

In the spaces of time between cleaning windows and removing paint from the portside exterior aluminum (again!) vent grills on Miss Trilly, I covered the bottom of the overhead shelves with Sunbrella®. The sticky coating on the mahogany skin, we discovered, originally held some kind of thin vinyl material. It is the same vinyl that is on the inside of the drawer stack in the aft seat and that had been applied to the two barrier boards that protects wiring, all of which is peeling off. This covering had dried out and come loose long ago and had been torn away. The remnants were still stuck along the edges where the shelves were held by the aluminum framing.

Clark cut new sliding door panels out of scrap doorskin material we had on hand and painted these to match the window trim. We have reinstalled the shelves (correcting an egregious misalignment while doing so) and remounted the original under-cabinet light fixtures. These are updated with Valspar spray paint. I removed the brown-painted frame on the lenses with acetone and Clark replaced the lamps with LEDs. He found adapters for the bayonet fitting. The doors now have contemporary knobs that coordinate with the original copper-colored/bronze latches.

Overhead ShelvesToday we finished the interior of the closet. The “rat fur” has been replaced by “medium neutral” EZ-Flex automotive carpeting, which I glued in with latex carpet adhesive. Clark cut a mahogany panel for the floor, coated it with polyurethane and I covered that too with the carpet. We painted the raw wood sticks that held up the white (!) vinyl-coated wire shelves that came with the trailer to match the carpet. The closet now looks modern and clean. The auto carpet is well-made stuff and will be extremely durable.

The vinyl “wood” on the cabinetry is, unfortunately, in very good condition, with the exception of the top drawer. It was peeling badly, so I pulled off the vinyl. It may not work out, but I wrapped the drawer front with the same Sunbrella® that we used under the overhead shelves. We like how the fabric looks and hope that because Sunbrella® is scrubbable, we can keep it looking nice. The new pulls are elegant and they won’t catch on our pants pockets! Perhaps during the winter of 2014 we will have the gumption to makeover all the fake walnut particle wood doors. In truth, the original dark vinyl everywhere is looking very out of place now.Drawer

We each worked through several more tasks. Clark installed two 12-volt receptacles, one under the forward dinette, the other above the power converter, which is original equipment. We haven’t decided where to put the Morningstar solar controller yet. The wood headers for the roll-up shades are painted, so I am assembling them and gluing a wood strip into the hem. We should be ready to hang these by tomorrow afternoon, Friday at the latest. We will have crossed a threshold when the window coverings are finished. They will look fantastic – very Zen.

Here is what Miss Trilly’s port side looked like in January…OrigPort_sm

Here she is now – higher ground clearance and solar panel instead of AC.MissTrilly_Apr1stWe will be storing Miss Trilly in Oregon for the summer. She will be watched over by attentive family, who generously offered to harbor our sweetheart. We deliberated for weeks with choices for a weather cover for our treasure. Should we buy a full RV cover, build our own carport from wood or steel, or buy a temporary shelter? Money always a consideration, we did not want to spend more than $300. A shelter like the one from Costco that protected the trailer while we worked on the new axle would be perfect, but these were no longer available at Costco. We checked each time we went, which is fairly frequent when we are in California. Finally, on a visit just last week, we saw an employee atop a display assembling a large patio umbrella, so we asked him if they were expecting any of the carport shelters Costco had stocked in the past. He lead us to a stack of them that had just that morning been delivered! A very heavy box is now taking up a lot of room in Zuzu, our tow vehicle. Miss Trilly will be protected like royalty during her sequester in Oregon. We breathe easier now, another item checked off the list.

The finish line is in sight! Everything is coming together quickly now. We are getting antsy to hitch her up and be on our way! Photographs will be posted of the new and improved Miss Trilly as soon as they are available!

Happy travels,
Clark & 9ah

A Custom Floor Cloth

23 Saturday Feb 2013

Posted by clark9ah in Miss Trilly

≈ 1 Comment

Tags

design, DIY, interior, style

I spent a lot of time looking at choices for new floor covering for Miss Trilly–too much time. As part of the search, I sent for carpet tile samples from Flor.com. One of them was the perfect color–Porpoise–a soft taupe brown. We calculated how many 19.7″-square tiles we’d need to install. It was immediately obvious to us that we could not justify spending $300 for such a small area, no matter how nice it was. We continued to brainstorm for few more days. Nothing we researched seemed affordable, the right color, or the right look. As mentioned, we didn’t want to glue or tape anything down to the gelcoat and whatever we chose had to “work” with the design. Aesthetics are as important to us as function.

At a local carpet warehouse, I found a lovely commercial carpet remnant with a low, textured loop. It was, in fact, gorgeous. The piece was 12′ x 15′. We needed only 48 inches of it, but the owner declined to cut the remnant. Disappointed because I was truly hoping that I’d solved the dilemma, my head went back to working on a less expensive solution for covering the floor.

At dinner that evening, the answer came to me. I had been a commercial studio photographer for many years and I had always painted my own backdrops. Though I retired back in 2003, I still had all the canvas backgrounds and custom paper drops I’d created over the years. I knew there was one on very heavyweight canvas that was at least six feet wide. We pulled it down from on top of our kitchen cabinets where it was rolled up and laid it on out the bed. Measuring, we found it was just long enough to make into a custom floor cloth!

While it seemed a shame to paint over the very attractive background, I was already envisioning what the new floor cloth would look like. It would be good to put the canvas to a new use that we would enjoy looking at when traveling with Miss Trilly. Days earlier, I had selected some paint colors that coordinated with our fabrics. All I needed to do was buy the paint and get to work.

Next day, I drove to Home Depot and had the “paint master” mix sample pots of two colors, with an additional color that matches the gelcoat for use later on. She color-matched my swatches of Glidden GLN29 “Soft Suede” and Valspar ar721 “Liberty Bell”. These are the only two colors I used to create the floor cloth. The total cost of the paint was about $6. The canvas was free, given to me by an artist friend decades ago, painted and used by me as a photo backdrop, now to become part of Miss Trilly‘s interior makeover. My friend was pleased to learn that we will enjoy her gift for many more years.

Taking a deep breath, I plunged into the project. Over a few days’ time, I layered up the paint colors. First, I brushed on a thinned base coat with the darker shade and let it dry overnight. Next, I used a 4-inch brush to apply broad strokes with the lighter shade, mixed with the darker paint to tone it. Dry brushing a bit over these shapes gave them a more random look. I splattered on some paint and drew some quick curving lines with the darker shade to add even more randomness. We all felt the “rug” was looking pretty good at this point and could have left it there, but I wanted to take it a step further.

Stepping back to contemplate the design, I decided to repeat the leaf design from the Barrow fabric we are using. I began by drawing a freehand version of one of the clusters onto heavy building paper and cutting a stencil. I began by stenciling the leaves in the darker shade, alternating the direction of the cluster. After an overnight period to dry, I layered on a stencil of the lighter shade, also toned down, dry brushed a bit for texture. The finale was a another splattering of the lighter shade.

Today, I am coating the painted floor cloth with Rust-Oleum Ultimate Polyurethane, matte finish. I took a photo of the finished cloth with the fabrics that inspired the colors and design. We are very excited and can hardly wait to see it in place inside Miss Trilly! We will have to be patient. The trailer is very high off the ground, up on jackstands and wooden beams. Her trailer has been rolled out from under her. Clark cut off the old axle and has cleaned up the trailer, which is in very good shape considering its age. The welder will come on Monday to install the new Dexter axle. I must wait until the trailer is back on her frame to get inside and fit the new cloth to the floor. Once it is cut to shape, I will be gluing on a felt backing and folding back a hem to finish the edges. Meanwhile, I will be working on sewing the new upholstery for the back cushions.

The interior fabrics and floor cloth for Miss Trilly…

Floor_FabricsHappy travels,
9ah and Clark

New Seat Cushions

11 Monday Feb 2013

Posted by clark9ah in Miss Trilly

≈ Leave a comment

Tags

DIY, interior refurbishing, sewing, Trillium trailer, vintage trailer

Yesterday, I am proud to say, marked the completion of new upholstery on the seat cushions. We are pleased with the textured Crypton fabric and are certain it will wear extremely well. The color complements the buttercream of the trailer’s gelcoat. I chose a very elegant Barrow fabric with a leaf pattern for the seat backs.

Crypton Textured Earth for the seats:Crypton-Fabric

Barrow M8221 Chameleon for the back cushions:BacksFabric

My mom’s 85-year-old Singer sewing machine performed the majority of the stitching. She says it was Singer’s very first electric model. I was unable to get the tension set properly on my much younger and fancier Brother machine. It does a myriad of decorative stitches, but apparently doesn’t like heavy duty thread. The old Singer handled it just fine. I decided to make cushions with a top and bottom welt, so it would be nice to have a welting foot to make the sewing a bit easier, but I am making it work with a zipper foot.

And here is the result…
FwrdSeat1sm

SetteeSeat1Next, we will build up foam to make a deeper wrap-around back cushion for each front dinette seat. The flat cushions do not provide enough support as they are. The small table there was designed to drop down to make up a single bed, but we will never use it that way. Instead, we will create an attractive and inviting sitting area. This table will be utilized constantly, so the seats must be comfortable and functional.

Miss Trilly came with a new, one-piece foam mattress to fit the large, aft settee. It is very comfy! We will leave this mattress in place with the bed made up. Perhaps we will also have throw pillows there for lounging. You are probably wondering why I am going to the trouble to recover the cushions for this area. Just in case we decide to use the area as a table sometime in the future, we want everything updated while the fabrics are available and I am set up to sew.

We have ordered a new Torflex axle. The next post may be about the axle installation! Stay tuned…

Happy travels,
Clark & 9ah

Miss Trilly

Mr Higgins

Contents

  • About
  • Miss Trilly
    • Miss Trilly’s Attributes
    • Makeover Details
  • Mr Higgins
  • Links of Interest

Recent Posts

  • A Yearly Check-In?
  • 4,244 miles!
  • Fall Road Trip
  • Transition Journey
  • The Final Chapter (until Fall)

Archives

  • March 2016
  • February 2015
  • March 2014
  • November 2013
  • April 2013
  • March 2013
  • February 2013
  • January 2013

Blogs We Follow

  • WALKING WOMAN
  • Christopher Briscoe
  • Wright Away Sails Away
  • Birgitta Höglunds Paleo
  • tylersculinary
  • The Science of Human Potential
  • Adventures of Dave and Ann
  • WatsonsWander
  • Wheeling It: Tales From a Nomadic Life
  • Technomadia
  • Gone With The Wynns
  • The Graphic Side of Life
  • Movin' on
  • Travels with the Blonde Coyote
  • rvsue and her canine crew
  • WEB OF DEBT BLOG
  • Eat Like A Swede-LCHF (Low-Carb, High-Fat)
  • Red Road Diaries
  • Zeebra Designs & Destinations
  • Anita & Michael's travels
  • A Word in Your Ear
  • Worrall Travel R's
  • simpletravelourway
  • Family Outdoor Adventure

Copyright 2013

Text and photographs included in these pages are copyrighted to Nina Courtney Wagaman and/or Clark Wagaman, except where noted. You may NOT use either media on your website or on another website without express permission. However, you MAY quote a short excerpt with a link back to this website. Thank you very much for your interest.

Blog at WordPress.com.

WALKING WOMAN

Christopher Briscoe

At the intersection of storytelling and art.

Wright Away Sails Away

Going where the water is warm and clear.

Birgitta Höglunds Paleo

Let food be your medicine

tylersculinary

Tylers culinary blog

The Science of Human Potential

Understanding how to be the best you can be. Professor Grant Schofield.

Adventures of Dave and Ann

with appearances by Mr Higgins

WatsonsWander

with appearances by Mr Higgins

Wheeling It: Tales From a Nomadic Life

On the Road Since 2010, Traveling Across USA & Europe With Pets

Technomadia

Adventures in Nomadic Serendipity

Gone With The Wynns

The Graphic Side of Life

Movin' on

Meandering with camera...

Travels with the Blonde Coyote

Follow the Blonde Coyote and see more of the world!

rvsue and her canine crew

Living on less and enjoying life more

WEB OF DEBT BLOG

ARTICLES IN THE NEWS . . . . . . . . . . . . . . . . COMMENTS, FEEDBACK, IDEAS

Eat Like A Swede-LCHF (Low-Carb, High-Fat)

Join the LCHF movement in Sweden!

Red Road Diaries

Musings from the back roads

Zeebra Designs & Destinations

An Artist's Eyes Never Rest

Anita & Michael's travels

Just another WordPress.com weblog

A Word in Your Ear

Stories and Photographs of my travels, Tales of friends, family, animals and my life

Worrall Travel R's

with appearances by Mr Higgins

simpletravelourway

Beth and Joe enjoy simple and active travel – every day of the year. They started their trip in 2012 and are still slowly traveling the world.

Family Outdoor Adventure

  • Follow Following
    • Towing Miss Trilly
    • Join 538 other followers
    • Already have a WordPress.com account? Log in now.
    • Towing Miss Trilly
    • Customize
    • Follow Following
    • Sign up
    • Log in
    • Report this content
    • View site in Reader
    • Manage subscriptions
    • Collapse this bar
 

Loading Comments...